Thursday, May 30, 2013

Photoshop: Visual Puns

     This week in photoshop, we combined images to create visual puns. We used creative commons to look up images then combined the to portray common phrases or words. The assignment was very fun because I love puns. Also, I didn't have to fight with photoshop as much to get it to do what I wanted. Combining the images and arranging them the way I wanted was very easy. I am glad that I can use photoshop easily now because it used to be a big frustration for me. When I had to photoshop assignments in the past I always started hating the class. Now I  can do things with ease. I am glad I learned so much with photoshop even though I don't use it to tweak my photos that much. I can always use it to do fun assignments like this one!

Here are my puns:


Photo credits:
Clam picture- Todd Franklin, Feb. 08 2012
Smile- Aimeelovesyou, May 22, 2011, wordpress
Eyes- betsy2you, kaboodle

Pair of birds- ljmacphee, January 5, 2006 flickr
Pink heart- Roosevelt collection, Feb. 8 2012, blog
Red hearts- kablam, drawn by George Supreeth, Jan. 14, 2009, clipart

Rope- Matti Mattila, March 9, 2012. flickr
Person- craig Cloutier, December 31, 2008 flickr


Answers: Happy as a clam. Love Birds. On the ropes. 


Tuesday, May 28, 2013

Open Assignment- Trash

     This week I did my open assignment. Last week when taking pictures for shadows I used a dead flower to try to create a cool shadow. I took pictures of the flower as well, which is where I got the inspiration for this assignment. I decided to try to find broken things around my house that we just never get rid of no matter how bad it gets. That strategy was hard. My parents get rid of anything broken. I took picture of basement which is currently under construction so I got quite a few pictures from there. My favorite pictures where that of the dead flowers around and that is what I ended up picking. Most pictures I feel like where better in color since I tried to put my subject on a plain background. I liked this assignment because I think it's fun to look at broken things and try to fix them so we can keep them and use them again. 

Best photo
ISO: 400
Aperture: f5.6
Shutter Speed: 1/50s


Thursday, May 23, 2013

Photoshop: School Context Project

     This week we transformed the school. We took a picture of a place in the school and then using photoshop, we turned the place into something of our imagination. We cut out items from other pictures and moved them into the background picture from the school. This assignment was really fun. I liked cutting out things from pictures I got off the internet to put them into the school. I'm not really a imaginative person, but putting things into the gym was fun. I think that it was a great assignment to test my understanding of photoshop as well because I had to use many tools to stitch the photo together. Making the scene look natural was a challenge but after some tips from Mr. Bush, it went together nicely. The picture wasn't exactly what was I wanted but I think it looks nice. The only other thing I wanted to add was a bridge connecting the railings and the track, but whenever I tried to do that it looked very unnatural. Below is my final image.


And here is another I quickly put together once I got done with my first one: 


Monday, May 20, 2013

Light and Shadows

     For this week I explored lighting and shadows. As you can see, there are not many pictures with shadows because I couldn't find shadows that I thought could be a good subject. I mostly took this assignment to explore the magic of silhouettes. I really like silhouettes because it makes the picture mysterious. To take silhouettes, what I did was take a light meter on the sky instead of the subject. When the sky had good exposure, the subject would be dark so you would only see the outline. I couldn't really decide what to use a subject so being the person I am, I choose to shoot mostly nature. I like the picture with my house as the silhouette, I think it can cause people to wonder about what is going on in the house. Even though other pictures are a better use of color and have richer colors, I like using the house for the subject. Also, I think I got bored of trees when I started actually looking at the pictures so the house is a good break. It was fun to take this set of pictures and I loved exploring silhouettes.

Best Photo
ISO:100
Shutter speed: 1/250
Aperture: 22


Friday, May 17, 2013

Portrait

     This week we learned about light. Our main focus was three point lighting. There is a main light that is off the the side of the person. The reflector is on the opposite side of the main light or key light. This reflector on the opposite side lights up the side of the face of the subject away from the main light. Lastly, the hair is light is behind the person. It creates a small halo effect on the person and makes the person stand out from the background. When using the sun light coming in from the window as main light, the only two lights you use are the main light (from the sunlight) and a reflecting surface for the secondary light. Also, we learned about making a good portrait. Some tips we used were making your subject comfortable, using a large aperture, and using a relatively fast shutter speed like 1/60 of a second. We used these lighting skills to take portraits of people in our class. I think that these skills really helped define the subject's face light up and it was fun to take portraits. I don't like taking pictures of people, though, so I won't use these skills specifically for portraits most likely but I could use it for other lighting in pictures.


Monday, May 13, 2013

Light Painting

     This week I did light painting. It was not fun. The taking of the pictures is hard because I was never satisfied with the light and I always wanted it to be darker. Also, I could never find a good place to take the pictures. I ended up in the basement of my house just because it was the darkest place I could find when I was taking the pictures. Another reason I did not like it was because of the designs I created. I always thought I was making one kind of picture but it never turned out like I wanted. Finally, when positioning the camera, I could never find a spot that gave me the right angle at the right height. The process was very frustrating. After taking about 3 pictures I was so done with the whole process and I wanted to throw the camera against the wall (however I did not because my father would have been very upset with me). Later, when I finished the process and started looking at my pictures I hated them all. To me, they look alright but they don't represent anything or mean anything to me. That really bothered me and made it hard to pick one that I actually liked. Some of the designs were nice but they did not elicit any emotion. All in all, I do not like light painting myself and probably would never do it in any of my pictures again, although I do enjoy seeing some pictures with light painting. 

ISO: 100
Aperture: f5.6
Shutter Speed: 1/15


Friday, May 10, 2013

Photoshop: Panoramic

     This week we worked on panoramic pictures in class. A panoramic picture is a picture that has a wider view to show more of what you would be able to see than a standard picture. Putting in multiple pictures to photoshop and using Photomerge stitch the pictures together allowed to picture to encompass more. To create a panoramic, there is a certain technique. I learned that a tripod makes it tens times easier to create a panoramic. You have too them camera in the same exact place, pretty much, but just turn it to capture separate pictures to put together. Some more important aspects of creating a panoramic is to shoot on manual settings. This means controlling the aperture, shutter speed, ISO, and focus. It is important to not having any automatic settings to minimize discrepancies between the pictures. Any differences will stand out when putting the pictures together and the whole panoramic will look odd. Taking the pictures was the big challenge of the project. because you need to overlap the subject for a third of the picture. This was essential when creating the panoramic in photoshop since photoshop would need to see where the pictures could fit together. I think when I was taking the pictures, I always overlapped too much or too little. After my first couple pictures, I got the hang out it, though. Below are the shots I put together.


Tuesday, May 7, 2013

Panning Motion

     In this assignment, we went outside and took panning motion pictures. To do this we had to pre-focus and move the camera with the subject. I learned that timing is key. To get the background blurred but the subject in focus, you would had to take the picture right around where you pre-focused. If the subject wasn't in that general area, the subject wouldn't totally be in focus. Pre-focusing was also a weird thing to do. Pre-focusing is focusing on a point where the subject will be when it is moving. I focused on the street where Mr. Bush would be when I took the picture. It was sometimes hard to get him at that exact spot and I had to remember to not take the picture until then. I eventually got it down and I got some pretty well timed pictures to show the background blurred. Below are a couple of my best pictures demonstrating how the panning is suppose to look.

Monday, May 6, 2013

Animals

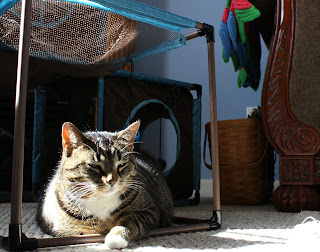
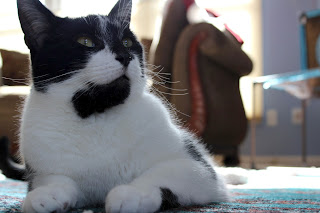
     This week I decided to use my animal pictures. I have been taking them for the past couple weeks. The fatter, not black and white cat named Daisy was very into having her picture taken. Every time I sat down to take pictures of her, she seemed to smile and she started to purr. Oreo, the black and white cat, always just got confused. Most of the time he just started to inspect the camera and possibly attack it. I tried to take them outside to have more lighting but Daisy just hid under our bay window and Oreo got scared of the wind and wanted to go inside. It was hard to get pictures of my cats doing interesting things because they are very boring, but I like the pictures I got. I wish my cats were more cooperative so I could have taken pictures outside with better lightning.

Exposure Triangle:
Aperture: f5.6
Shutter Speed: 1/50
ISO: 400